0. 실습 목표
이번 실습은 Windows 환경에서 Minikube 클러스터를 실행하고, 해당 Kubernetes 클러스터 위에 Argo CD를 설치한 뒤 Git 저장소를 연결하여 Argo CD Application을 생성하는 과정입니다.
단순히 명령어만 실행하는 실습이 아니라, 원래 Linux 기준으로 작성된 Argo CD 설치 흐름을 Windows PowerShell 환경에 맞게 변환하면서 진행한 실습입니다.
전체 흐름은 다음과 같습니다.
Minikube 클러스터 실행
→ Argo CD 설치
→ Argo CD 서버 접속 설정
→ Argo CD CLI 설치
→ 초기 admin 계정 로그인
→ Git Repository 연결
→ Argo CD Application 생성
→ Path 설정 오류 확인 및 수정
1. Argo CD 설치
실행 명령
kubectl apply -n argocd -f https://raw.githubusercontent.com/argoproj/argo-cd/stable/manifests/install.yaml명령어 의미
kubectl apply
→ Kubernetes 클러스터에 리소스를 생성하거나 수정한다.

-n argocd
→ argocd 네임스페이스에 리소스를 적용한다.

-f https://...
→ 지정한 URL의 YAML 매니페스트 파일을 가져와 적용한다.
즉, 이 명령은 Argo CD 공식 설치 YAML 파일을 현재 Kubernetes 클러스터의 argocd 네임스페이스에 적용하는 명령입니다.
생성되는 주요 리소스
CRD
ServiceAccount
Role / ClusterRole
RoleBinding / ClusterRoleBinding
ConfigMap
Secret
Service
Deployment
StatefulSet
NetworkPolicy
발생한 문제
실행 중 대부분의 리소스는 정상 생성되었지만, 아래 에러가 발생했습니다.
The CustomResourceDefinition "applicationsets.argoproj.io" is invalid:
metadata.annotations: Too long: must have at most 262144 bytes
원인
기본 kubectl apply는 client-side apply 방식으로 동작합니다.
이 방식은 적용한 YAML 내용을 kubectl.kubernetes.io/last-applied-configuration annotation에 저장하려고 합니다.
그런데 Argo CD의 일부 CRD는 내용이 크기 때문에 Kubernetes annotation 크기 제한인 262144 bytes를 초과할 수 있습니다.
해결 명령
kubectl apply --server-side -n argocd -f https://raw.githubusercontent.com/argoproj/argo-cd/stable/manifests/install.yaml명령어 의미
--server-side
→ 클라이언트가 전체 적용 내용을 annotation에 저장하지 않고,
  Kubernetes API 서버가 리소스 병합과 관리를 담당하게 한다.
즉, 큰 CRD를 적용할 때 발생할 수 있는 annotation 크기 제한 문제를 피하기 위해 --server-side 옵션을 사용했습니다.
확인 명령
kubectl get crd | findstr argoproj정상적으로 설치되면 아래와 같은 CRD가 확인됩니다.
applications.argoproj.io
applicationsets.argoproj.io
appprojects.argoproj.io
2. Argo CD 서버 Service 타입 변경
Argo CD 서버에 외부에서 접근하기 위해 argocd-server Service 타입을 LoadBalancer로 변경했습니다.
2-1. Linux / Git Bash 기준 명령
kubectl patch svc argocd-server -n argocd -p '{"spec":{"type":"LoadBalancer"}}'2-2. Windows PowerShell 기준 명령
kubectl patch svc argocd-server -n argocd -p "{`"spec`":{`"type`":`"LoadBalancer`"}}"2-3. 두 명령의 공통점
두 명령은 모두 Kubernetes Service 리소스의 일부 필드만 수정합니다.
수정 대상은 아래와 같습니다.
{
  "spec": {
    "type": "LoadBalancer"
  }
}
즉, argocd-server Service의 타입을 LoadBalancer로 바꾸는 것이 목적입니다.
2-4. 두 명령의 차이점
Linux / Git Bash에서는 JSON 전체를 작은따옴표로 감싸면 내부의 큰따옴표가 그대로 유지됩니다.
-p '{"spec":{"type":"LoadBalancer"}}'반면 Windows PowerShell에서는 따옴표 처리 방식이 다르기 때문에 JSON 문자열 내부의 큰따옴표를 백틱으로 이스케이프해야 합니다.
-p "{`"spec`":{`"type`":`"LoadBalancer`"}}"대응 관계
| 개념 | Linux / Git Bash | Windows PowerShell |
|---|---|---|
| JSON 전체 감싸기 | 작은따옴표 '...' |
큰따옴표 "..." |
| JSON key/value의 큰따옴표 | 그대로 사용 | 백틱으로 이스케이프 |
| 예시 | '{"spec":{"type":"LoadBalancer"}}' |
"{"spec":{"type":"LoadBalancer"}}" |
왜 PowerShell에서 에러가 났는가
처음 아래 명령을 실행했을 때 에러가 발생했습니다.
kubectl patch svc argocd-server -n argocd -p '{"spec":{"type":"LoadBalancer"}}'에러:
Error from server (BadRequest): invalid character 's' looking for beginning of object key string이는 Kubernetes가 이상한 것이 아니라, PowerShell이 JSON 문자열을 kubectl에 전달하는 과정에서 따옴표가 의도대로 유지되지 않았기 때문입니다.
따라서 Windows PowerShell에서는 JSON을 넘길 때 백틱 이스케이프를 사용해야 합니다.
3. Service 상태 확인
kubectl get svc -n argocd argocd-server예시 결과:
NAME            TYPE           CLUSTER-IP      EXTERNAL-IP   PORT(S)
argocd-server   LoadBalancer   10.110.108.79   <pending>     80:31709/TCP,443:32168/TCP
결과 해석
TYPE: LoadBalancer
→ Service 타입이 LoadBalancer로 변경되었다.

EXTERNAL-IP: <pending>
→ Minikube 로컬 환경에는 실제 클라우드 LoadBalancer가 없기 때문에 외부 IP가 할당되지 않았다.

80:31709/TCP
→ Service의 80 포트가 NodePort 31709로 연결된다.

443:32168/TCP
→ Service의 443 포트가 NodePort 32168로 연결된다.
왜 <pending>이어도 실습이 가능한가
클라우드 환경에서는 LoadBalancer 타입 Service를 만들면 외부 IP가 자동으로 할당됩니다.
하지만 Minikube 로컬 환경에서는 실제 클라우드 LoadBalancer가 없기 때문에 EXTERNAL-IP가 <pending>으로 남을 수 있습니다.
그래서 이번 실습에서는 port-forward를 사용해 로컬 PC에서 Argo CD 서버로 접근했습니다.
4. Argo CD CLI 설치
교재의 명령은 Linux 기준이었기 때문에 Windows PowerShell 방식으로 바꾸어 실행했습니다.
4-1. 최신 Argo CD 버전 조회
Linux 기준
VERSION=$(curl --silent "https://api.github.com/repos/argoproj/argo-cd/releases/latest" | grep '"tag_name"' | sed -E 's/.*"([^"]+)".*/\1/')Windows PowerShell 기준
$VERSION = (Invoke-RestMethod "https://api.github.com/repos/argoproj/argo-cd/releases/latest").tag_name공통점
두 명령 모두 GitHub API를 호출해서 Argo CD의 최신 릴리스 버전 값을 가져옵니다.
예시 결과:
v3.4.1차이점
Linux에서는 curl, grep, sed를 조합해서 JSON 응답에서 tag_name 값을 문자열로 추출합니다.
Windows PowerShell에서는 Invoke-RestMethod가 JSON 응답을 객체로 변환해주기 때문에 .tag_name으로 바로 접근할 수 있습니다.
변수 대응 관계
| 개념 | Linux | Windows PowerShell |
|---|---|---|
| 변수명 | VERSION |
$VERSION |
| 변수 대입 | VERSION=... |
$VERSION = ... |
| 변수 사용 | $VERSION |
$VERSION |
| JSON 파싱 방식 | grep, sed로 문자열 처리 |
.tag_name 속성 접근 |
| HTTP 요청 | curl --silent |
Invoke-RestMethod |
명령어 분해
Linux
curl --silent "https://api.github.com/repos/argoproj/argo-cd/releases/latest"GitHub API를 호출합니다.
grep '"tag_name"'응답 중 tag_name이 포함된 줄만 찾습니다.
sed -E 's/.*"([^"]+)".*/\1/'해당 줄에서 버전 문자열만 추출합니다.
VERSION=$(...)추출한 값을 VERSION 변수에 저장합니다.
Windows PowerShell
Invoke-RestMethod "https://api.github.com/repos/argoproj/argo-cd/releases/latest"GitHub API를 호출하고 JSON 응답을 PowerShell 객체로 변환합니다.
.tag_name응답 객체에서 tag_name 속성만 꺼냅니다.
$VERSION = ...꺼낸 버전 값을 $VERSION 변수에 저장합니다.
4-2. Argo CD CLI 다운로드
Linux 기준
sudo curl -sSL -o /usr/local/bin/argocd https://github.com/argoproj/argo-cd/releases/download/$VERSION/argocd-linux-amd64Windows PowerShell 기준
Invoke-WebRequest -Uri "https://github.com/argoproj/argo-cd/releases/download/$VERSION/argocd-windows-amd64.exe" -OutFile "C:\Windows\System32\argocd.exe"공통점
두 명령 모두 $VERSION 변수에 들어 있는 버전을 사용해서 GitHub Release에서 Argo CD CLI 실행 파일을 다운로드합니다.
차이점
Linux에서는 Linux용 바이너리인 argocd-linux-amd64를 다운로드합니다.
Windows에서는 Windows용 실행 파일인 argocd-windows-amd64.exe를 다운로드합니다.
또한 저장 위치도 다릅니다.
대응 관계
| 개념 | Linux | Windows PowerShell |
|---|---|---|
| 다운로드 명령 | curl |
Invoke-WebRequest |
| URL 옵션 | 직접 URL 작성 | -Uri |
| 저장 위치 옵션 | -o |
-OutFile |
| 저장 위치 | /usr/local/bin/argocd |
C:\Windows\System32\argocd.exe |
| 다운로드 파일 | argocd-linux-amd64 |
argocd-windows-amd64.exe |
| 실행 파일 확장자 | 없음 | .exe |
| 관리자 권한 | sudo 사용 |
관리자 PowerShell 권장 |
경로 차이
Linux
/usr/local/bin/argocd/usr/local/bin은 일반적으로 PATH에 포함되어 있는 실행 파일 경로입니다.
따라서 여기에 argocd 파일을 저장하면 터미널에서 바로 argocd 명령을 사용할 수 있습니다.
Windows
C:\Windows\System32\argocd.exeC:\Windows\System32도 일반적으로 PATH에 포함되어 있습니다.
따라서 여기에 argocd.exe를 저장하면 PowerShell에서 바로 argocd 명령을 사용할 수 있습니다.
4-3. 실행 권한 부여
Linux 기준
sudo chmod +x /usr/local/bin/argocdWindows PowerShell 기준
# 별도 chmod 명령 필요 없음공통점
목적은 다운로드한 Argo CD CLI 파일을 터미널에서 실행 가능하게 만드는 것입니다.
차이점
Linux에서는 파일에 실행 권한이 있어야 실행할 수 있습니다.
그래서 chmod +x로 실행 권한을 부여합니다.
Windows에서는 .exe 실행 파일이면 별도의 chmod +x 과정이 필요하지 않습니다.
대응 관계
| 개념 | Linux | Windows |
|---|---|---|
| 실행 가능하게 만들기 | chmod +x |
.exe 파일 다운로드로 충분 |
| 실행 파일명 | argocd |
argocd.exe |
| 실행 방식 | argocd |
argocd 또는 argocd.exe |
4-4. 설치 확인
argocd version --client이 명령은 로컬에 설치된 Argo CD CLI 버전을 확인합니다.
여기서 --client는 서버까지 연결하지 않고, 현재 PC에 설치된 CLI 버전만 확인하겠다는 의미입니다.
5. 초기 admin 비밀번호 확인
Argo CD는 설치 시 admin 계정의 초기 비밀번호를 Kubernetes Secret에 저장합니다.
5-1. Linux 기준
kubectl -n argocd get secret argocd-initial-admin-secret -o jsonpath="{.data.password}" | base64 -d; echo5-2. Windows PowerShell 기준
$encoded = kubectl -n argocd get secret argocd-initial-admin-secret -o jsonpath="{.data.password}"
[System.Text.Encoding]::UTF8.GetString([System.Convert]::FromBase64String($encoded))
공통점
두 방식 모두 Kubernetes Secret에서 password 값을 꺼내고, base64 디코딩해서 실제 초기 비밀번호를 확인합니다.
Kubernetes Secret의 data 값은 base64로 인코딩되어 있기 때문에 디코딩 과정이 필요합니다.
차이점
Linux에서는 base64 -d 명령으로 바로 디코딩합니다.
Windows PowerShell에서는 .NET 클래스를 사용해서 base64 문자열을 디코딩합니다.
변수 대응 관계
| 개념 | Linux | Windows PowerShell |
|---|---|---|
| Secret 조회 | kubectl ... -o jsonpath="{.data.password}" |
동일 |
| base64 디코딩 | base64 -d |
[System.Convert]::FromBase64String() |
| 문자열 변환 | echo로 출력 |
[System.Text.Encoding]::UTF8.GetString() |
| 중간 변수 | 파이프라인으로 바로 전달 | $encoded 변수에 저장 |
Windows 명령어 분해
$encoded = kubectl -n argocd get secret argocd-initial-admin-secret -o jsonpath="{.data.password}"Secret에서 base64로 인코딩된 password 값을 꺼내 $encoded 변수에 저장합니다.
[System.Convert]::FromBase64String($encoded)base64 문자열을 바이트 배열로 디코딩합니다.
[System.Text.Encoding]::UTF8.GetString(...)디코딩된 바이트 배열을 UTF-8 문자열로 변환합니다.
즉, 최종적으로 실제 admin 초기 비밀번호가 출력됩니다.
6. Argo CD 로컬 접속 설정
처음에는 Service의 NodePort를 이용해 접속하려고 했습니다.
Service 조회 결과는 다음과 같았습니다.
80:31709/TCP,443:32168/TCPHTTPS 포트는 443:32168/TCP이므로, NodePort 기준 접속 포트는 32168입니다.
처음에는 아래처럼 접속을 시도했습니다.
argocd login localhost:32168하지만 아래 오류가 발생했습니다.
connectex: No connection could be made because the target machine actively refused it.원인
Minikube 환경에서는 NodePort가 Windows의 localhost로 바로 연결되지 않을 수 있습니다.
따라서 로컬 PC에서 Kubernetes 내부 Service로 안정적으로 접근하기 위해 kubectl port-forward를 사용했습니다.
6-1. port-forward 명령
kubectl port-forward svc/argocd-server -n argocd 18080:443명령어 의미
kubectl port-forward
→ 로컬 PC 포트와 Kubernetes 내부 리소스 포트를 연결한다.

svc/argocd-server
→ argocd-server Service로 포워딩한다.

-n argocd
→ argocd 네임스페이스에 있는 Service를 대상으로 한다.

18080:443
→ 내 PC의 18080 포트를 argocd-server Service의 443 포트로 연결한다.
실제 연결 흐름
내 PC localhost:18080
→ Kubernetes argocd-server Service 443
→ argocd-server Pod 8080
실행 결과:
Forwarding from 127.0.0.1:18080 -> 8080
Forwarding from [::1]:18080 -> 8080
여기서 -> 8080으로 보이는 이유는 Service의 443 포트가 실제 Pod 내부의 8080 포트로 연결되기 때문입니다.

6-2. 8080 포트를 18080으로 바꾼 이유
처음에는 아래처럼 시도했습니다.
kubectl port-forward svc/argocd-server -n argocd 8080:443하지만 Windows에서 8080 포트를 사용할 수 없어 아래 에러가 발생했습니다.
Unable to listen on port 8080
bind: An attempt was made to access a socket in a way forbidden by its access permissions.
그래서 로컬 포트를 8080이 아닌 18080으로 바꾸었습니다.
kubectl port-forward svc/argocd-server -n argocd 18080:443대응 관계
| 개념 | 값 |
|---|---|
| 로컬 PC 포트 | 18080 |
| Kubernetes Service 포트 | 443 |
| 실제 Pod 포트 | 8080 |
| 브라우저 접속 주소 | https://localhost:18080 |
| CLI 로그인 주소 | localhost:18080 |
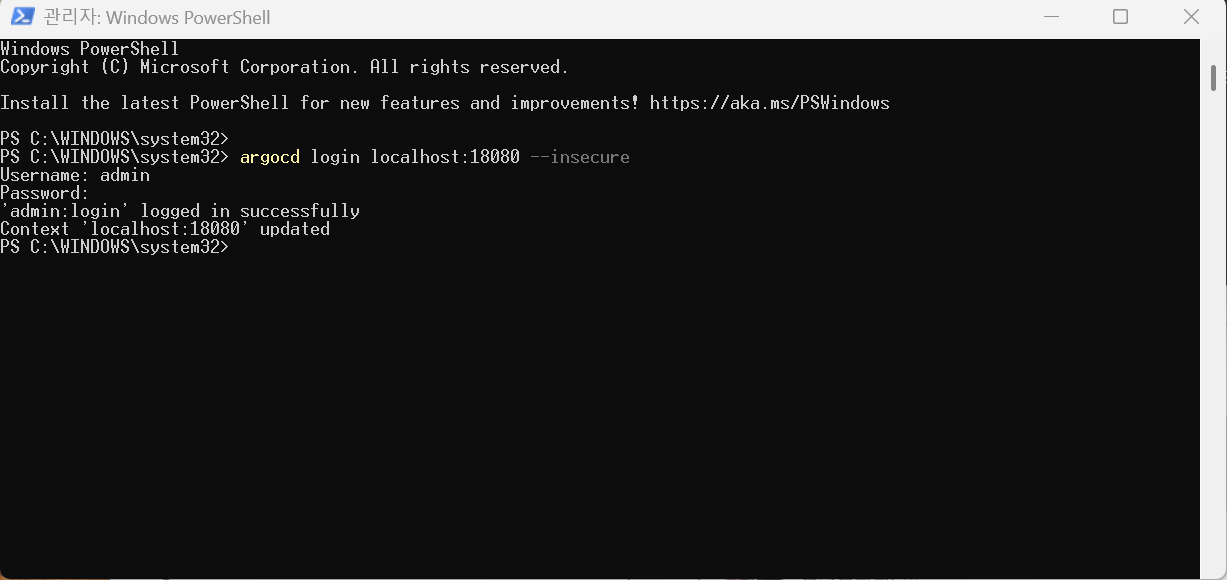
7. Argo CD CLI 로그인
port-forward가 열린 상태에서 새 PowerShell 창을 열고 로그인합니다.
argocd login localhost:18080 --insecure명령어 의미
argocd login
→ Argo CD 서버에 CLI로 로그인한다.

localhost:18080
→ port-forward로 열어둔 Argo CD 서버 주소다.

--insecure
→ 자체 서명 인증서로 인한 인증서 검증 오류를 무시한다.
로그인 입력값:
Username: admin
Password: 초기 admin 비밀번호
브라우저 접속 주소:
https://localhost:18080

8. Minikube 재시작 시 주의사항
중간에 모든 창을 종료한 뒤 다시 실행하려고 했을 때, kubectl port-forward가 실패했습니다.
Unable to connect to the server:
dial tcp 127.0.0.1:58018: connectex: No connection could be made
이는 Argo CD 문제가 아니라 Minikube Kubernetes API 서버가 꺼져 있거나 정상 응답하지 않는 상태였기 때문입니다.
8-1. driver mismatch 문제
처음에는 아래 명령으로 Minikube를 다시 시작하려고 했습니다.
minikube start -p argocd-lab --driver=hyperv하지만 아래 오류가 발생했습니다.
GUEST_DRIVER_MISMATCH:
The existing "argocd-lab" cluster was created using the "docker" driver,
which is incompatible with requested "hyperv" driver.
원인
기존 argocd-lab 클러스터는 docker driver로 생성되었는데, 재시작할 때 hyperv driver를 사용하려고 해서 충돌이 발생했습니다.
따라서 기존 클러스터와 동일한 driver인 docker로 시작해야 합니다.
minikube start -p argocd-lab --driver=docker8-2. 다시 시작하는 전체 흐름
minikube start -p argocd-lab --driver=docker
minikube update-context -p argocd-lab
kubectl get nodes
kubectl get pods -n argocd
kubectl port-forward svc/argocd-server -n argocd 18080:443
명령어 의미
minikube start -p argocd-lab --driver=dockerargocd-lab Minikube 클러스터를 docker driver로 다시 시작합니다.
minikube update-context -p argocd-lab현재 kubectl 컨텍스트를 argocd-lab 클러스터로 맞춥니다.
kubectl get nodeskubectl이 Kubernetes API 서버와 정상 통신하는지 확인합니다.
kubectl get pods -n argocdArgo CD Pod들이 정상 실행 중인지 확인합니다.
kubectl port-forward svc/argocd-server -n argocd 18080:443Argo CD 서버를 다시 로컬에서 접속 가능하게 엽니다.
9. Git Repository 연결 오류
Argo CD에서 Git Repository를 연결하는 과정에서 아래 오류가 발생했습니다.
Invalid username or token.
Password authentication is not supported for Git operations.
원인
Git 저장소 접근 시 계정 비밀번호를 사용했기 때문에 발생했습니다.
GitHub, GitLab 등의 Git 서비스는 HTTPS Git 작업에서 계정 비밀번호 인증을 지원하지 않습니다.
따라서 Argo CD Repository 연결 시 Password 칸에는 실제 계정 비밀번호가 아니라 Access Token을 입력해야 합니다.
Repository 연결 정보
Repository URL : Git 저장소 HTTPS URL
Username       : Git 계정 아이디
Password       : Access Token
GitLab의 경우 토큰에는 보통 다음 권한이 필요합니다.
read_repository10. 빈 Repository 오류
그다음 발생한 오류는 아래와 같습니다.
remote repository is empty원인
인증은 성공했지만, Git 저장소에 아직 커밋이 하나도 없어서 발생한 문제입니다.
Argo CD는 저장소의 HEAD, main, master 같은 브랜치를 기준으로 Kubernetes manifest를 조회합니다.
저장소가 비어 있으면 기준이 되는 브랜치가 없어 Repository 연결 또는 Application 생성이 실패할 수 있습니다.
해결
저장소에 최초 커밋을 하나 올려야 합니다.
git clone <REPOSITORY_URL>
cd <REPOSITORY_NAME>
echo "# argocd-lab" > README.md
git add README.md
git commit -m "chore: initial commit"
git branch -M main
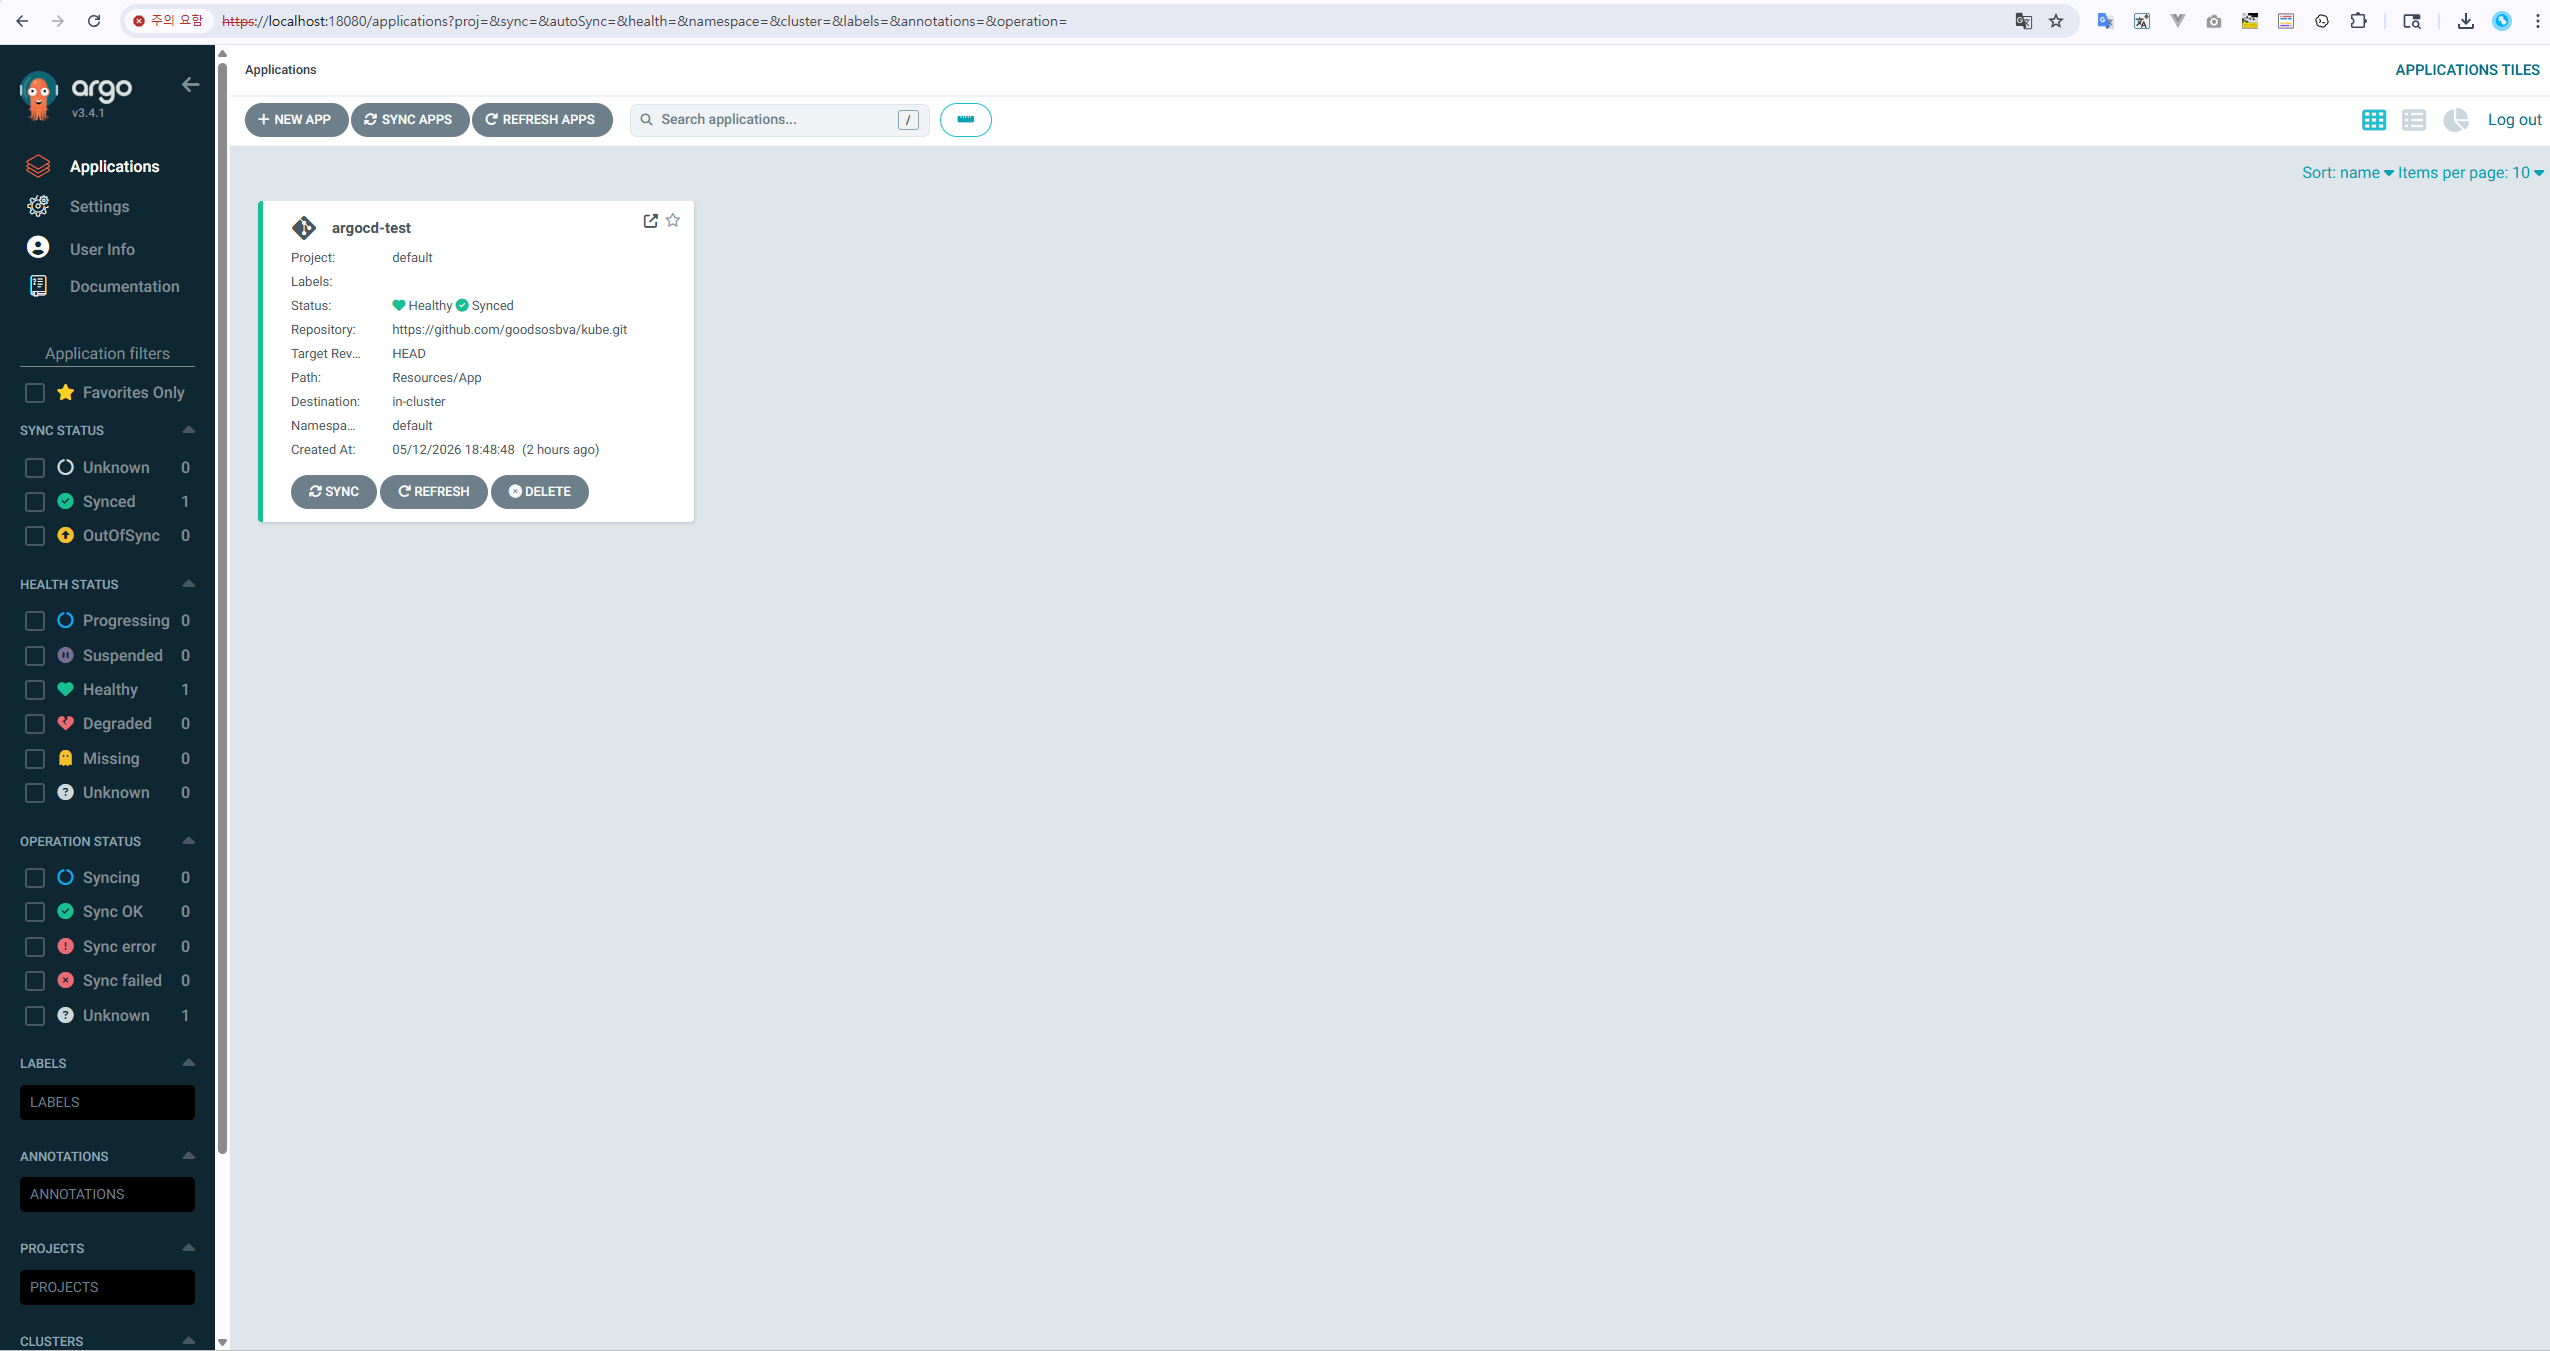
git push -u origin main11. Application 생성 시 Path 오류
Repository 연결 후 Argo CD Application을 생성하는 과정에서 아래 오류가 발생했습니다.
Unable to create application:
application spec for argocd-test is invalid:
InvalidSpecError:
Unable to generate manifests in Resource/App:
app path does not exist
원인
Argo CD가 Git 저장소는 읽었지만, Application 설정에 입력한 Path 경로를 저장소 안에서 찾지 못했기 때문에 발생했습니다.
처음 입력한 Path는 다음과 같았습니다.
Resource/App하지만 실제 Git 저장소 화면에서 확인한 경로는 다음과 같았습니다.
kube / Resources / App즉, 실제 경로는 다음입니다.
kube/Resources/App오류가 발생한 이유는 두 가지입니다.
1. 앞에 kube 경로가 빠져 있었음
2. Resource가 아니라 Resources였음
Git 경로는 대소문자와 폴더명을 정확하게 구분합니다.
따라서 아래 값들은 모두 서로 다른 경로입니다.
Resource/App
Resources/App
kube/Resources/App
kube/resource/app
해결
Application 생성 시 Path 값을 아래처럼 수정해야 합니다.
kube/Resources/App12. Linux 명령과 Windows PowerShell 명령 전체 비교
| 목적 | Linux 기준 | Windows PowerShell 기준 | 핵심 차이 |
|---|---|---|---|
| 최신 버전 조회 | `VERSION=$(curl ... | grep ... | sed ...)` |
| 변수 선언 | VERSION=값 |
$VERSION = 값 |
PowerShell 변수는 $ 포함 |
| 변수 사용 | $VERSION |
$VERSION |
사용 방식은 유사 |
| CLI 다운로드 | curl -o /usr/local/bin/argocd ...argocd-linux-amd64 |
Invoke-WebRequest -OutFile C:\Windows\System32\argocd.exe ...argocd-windows-amd64.exe |
OS별 바이너리 파일명이 다름 |
| 실행 권한 | chmod +x /usr/local/bin/argocd |
필요 없음 | Windows는 .exe 실행 파일 |
| Secret 디코딩 | base64 -d |
[System.Convert]::FromBase64String() |
PowerShell은 .NET 클래스 사용 |
| JSON patch | -p '{"spec":{"type":"LoadBalancer"}}' |
-p "{"spec":{"type":"LoadBalancer"}}" |
PowerShell은 큰따옴표 이스케이프 필요 |
| 로컬 접속 | NodePort 또는 LoadBalancer 가능 | Minikube에서는 port-forward가 안정적 | Windows localhost와 Minikube NodePort 연결 차이 |
| Argo CD 로그인 | argocd login localhost:<port> |
동일 | 자체 서명 인증서면 --insecure 사용 |
13. 최종 전체 명령어 흐름
1단계. Argo CD 네임스페이스 생성
kubectl create namespace argocd2단계. Argo CD 설치
kubectl apply -n argocd -f https://raw.githubusercontent.com/argoproj/argo-cd/stable/manifests/install.yamlCRD annotation 에러 발생 시:
kubectl apply --server-side -n argocd -f https://raw.githubusercontent.com/argoproj/argo-cd/stable/manifests/install.yaml3단계. Pod 상태 확인
kubectl get pods -n argocd4단계. argocd-server Service 타입 변경
kubectl patch svc argocd-server -n argocd -p "{`"spec`":{`"type`":`"LoadBalancer`"}}"5단계. Service 포트 확인
kubectl get svc -n argocd argocd-server6단계. Windows용 Argo CD CLI 설치
$VERSION = (Invoke-RestMethod "https://api.github.com/repos/argoproj/argo-cd/releases/latest").tag_name$VERSIONInvoke-WebRequest -Uri "https://github.com/argoproj/argo-cd/releases/download/$VERSION/argocd-windows-amd64.exe" -OutFile "C:\Windows\System32\argocd.exe"argocd version --client7단계. 초기 admin 비밀번호 확인
$encoded = kubectl -n argocd get secret argocd-initial-admin-secret -o jsonpath="{.data.password}"
[System.Text.Encoding]::UTF8.GetString([System.Convert]::FromBase64String($encoded))
8단계. port-forward 실행
kubectl port-forward svc/argocd-server -n argocd 18080:4439단계. 새 PowerShell에서 Argo CD 로그인
argocd login localhost:18080 --insecure10단계. 브라우저 접속
https://localhost:1808011단계. 비밀번호 변경
argocd account update-password12단계. Minikube 재시작 후 다시 접속
minikube start -p argocd-lab --driver=docker
minikube update-context -p argocd-lab
kubectl get nodes
kubectl get pods -n argocd
kubectl port-forward svc/argocd-server -n argocd 18080:443
14. 최종 정리
이번 실습에서 진행한 핵심은 다음과 같습니다.
1. Windows 환경에서 Minikube 클러스터 실행
2. argocd 네임스페이스에 Argo CD 설치
3. CRD annotation 크기 제한 문제를 server-side apply로 해결
4. argocd-server Service를 LoadBalancer로 변경
5. Linux용 CLI 설치 명령을 Windows PowerShell 명령으로 변환
6. Windows용 Argo CD CLI 설치
7. 초기 admin 비밀번호 확인
8. port-forward를 이용해 Argo CD 로컬 접속 구성
9. Argo CD CLI 및 브라우저 로그인
10. Git Repository 연결
11. Access Token 인증 문제 해결
12. 빈 Repository 문제 해결
13. Application 생성 시 Git Path 불일치 문제 확인 및 수정
전체적으로 이번 실습은 Linux 기준의 Argo CD 설치 가이드를 Windows PowerShell 환경에 맞게 변환하면서 진행한 실습입니다.
가장 중요한 학습 포인트는 다음과 같습니다.
Linux 명령을 Windows에서 그대로 실행하면 안 되는 경우가 있다.
특히 curl, grep, sed, chmod, base64, JSON quoting 부분은 PowerShell 방식으로 바꿔야 한다.
또한 Argo CD Application 생성 오류는 Argo CD 설치나 Git 인증 문제가 아니라, Application Source Path가 실제 Git 저장소 경로와 다르게 입력되어 발생한 문제였습니다.
따라서 Application 생성 시 Path는 실제 저장소 구조에 맞게 아래처럼 설정해야 합니다.
kube/Resources/App이렇게 수정하면 Argo CD가 해당 경로에서 Kubernetes manifest를 읽고 Application을 생성할 수 있습니다.